


|
|
Arduino Nano R3 |
x 1 | |
|
|
6 DOF Sensor - MPU6050 |
x 1 | |
|
|
8x32 Led Matrix Module MAX7219 |
x 1 | |

|
SD1209T3-A1TDK Corporation
|
x 1 | |

|
G3B25AB-S-YANKK Switches
|
x 1 | |
|
|
Resistor, 56 ohm |
x 1 |

|
Soldering Iron Wire Welding Lead Roll |
|

|
Soldering iron |
Arduino MPU6050 Interactive scrolling game on 32x8 Led Matrix
This time I will show you how to make an interesting interactive game, on a 32 by 8 LED matrix, which is controlled by moving the device. During a certain movement of the device, the MPU6050 sensor sends a signal to the microcontroller, and based on that information, the microcontroller performs a given action on the screen.
In fact, the sensor represents a so-called air controller that we can find as part of remote controls for modern TVs. The project is featured on Benjamin Balogh's GiHub page (https://github.com/benibalogh/LEDMatrix-Games), where you can find the original code. The source code is made in Visual Studio with support for Arduino, known as Visual Micro.
Unfortunately, after compiling and uploading the original code to the Arduino, the device did not process data from MPU6050, and only scrolled the text "Wall Scroller". I tried to contact the author several times, but without success. After certain time of studying the code, with one small modification, I managed to adapt it. Also, instead of Visual Micro, I compiled it into a standard Arduino IDE.

To compile the code without errors, you should open the code from the given folder that contains all the required libraries. Let me emphasize that if you have previously installed any of these libraries in the Arduino IDE, you should delete them. I also added some simple tones to the code that don't interfere with gameplay and make the game much more interesting.

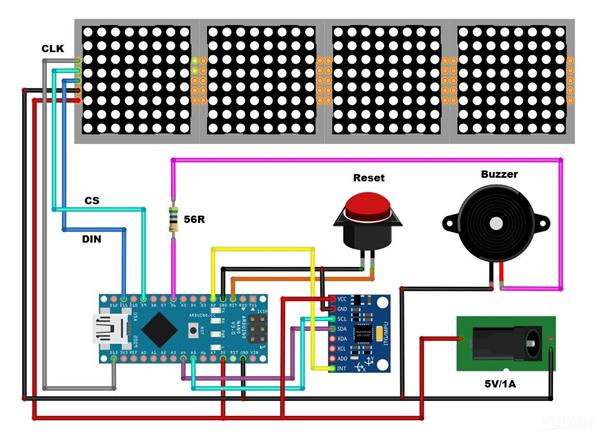
The device is extremely simple to build and consists of only few components:
- Arduino nano microcontroller
- MPU6050 Gyroscope + Accelerometer sensor module
- Buzzer
- 32x8 Led matrix module with MAX7219 drivers
- Battery, optionally like in my case one 3.7 Volts Lithium battery with charger, and boost module. Of cource you can use ordinary 9V battery, or external Power Supply.
- and two switches

if you want to make a PCB for this project, or for any other electronic project, PCBway is a great choice for you. PCBway is one of the most experienced PCB manufacturing company in China in field of PCB prototype and fabrication. They have a large online community where you can find a Open Source projects, and you can also share your project there. From my personal experience I can tell you that on this community you can find many useful projects with alredy designed PCBs, from where you can place an order directly.

After uploading the code, we need to make some settings. Depending on the mounting position of the sensor, we need to perform a calibration by changing the values in the following lines of code
constexpr float INIT_PITCH = radians(175.0f);
constexpr float MENU_BACK_ROLL = radians(-90.0f);
constexpr float MENU_ENTER_ROLL = radians(-155.0f)
constexpr auto TILT_ANGLE = 145;
constexpr float MENU_NAVIGATION_PITCH = radians(TILT_ANGLE + 30);
Angles can have positive and negative values
Immediately after switching on, a scrolling text with the name of the game appears. By tilting to the left we move through the menu. To activate an option, we tilt the device down. We return to the menu by tilting the device upwards. To start playing the game, when we are in the PLAY menu, we tilt the device down and then to the left. Now we play the game by moving left and right, trying not to hit the wall. With each passed segment, a certain number of points are obtained. After a certain time, the movement speed increases. When we collide into the wall, the end of the game is signaled and the result appears. By tilting up, we return to the main menu again.
Let me mention that the power supply is made with a 3.7V Lithium battery, a charger board for charging the battery, and a boost module that raises the voltage from 3.7V to 5V. The schematic diagram for the power supply is given in the figure below.

Finally, the device is installed in a suitable case made of PVC board and covered with colored wallpaper.
Arduino MPU6050 Interactive scrolling game on 32x8 Led Matrix


- Comments(0)
- Likes(0)
More by Mirko Pavleski
-
 Simple ESP32 Internet radio on VFD Display
Internet radio, also known as online radio or streaming radio, refers to the broadcasting of audio ...
Simple ESP32 Internet radio on VFD Display
Internet radio, also known as online radio or streaming radio, refers to the broadcasting of audio ...
-
 Short review of small music Tesla Coil with Bluetooth
A Solid State Tesla Coil (SSTC) is a type of Tesla coil that uses solid-state electronic components...
Short review of small music Tesla Coil with Bluetooth
A Solid State Tesla Coil (SSTC) is a type of Tesla coil that uses solid-state electronic components...
-
 Testing 2500W Large Induction Heater
An induction heater is a device that uses electromagnetic induction to heat objects. It consists of...
Testing 2500W Large Induction Heater
An induction heater is a device that uses electromagnetic induction to heat objects. It consists of...
-
 Arduino FFT Audio Spectrum analyzer on 8x32 color matrix WS2812B
The spectrum analyzer displays the amplitude of signals as a function of frequency, allowing engine...
Arduino FFT Audio Spectrum analyzer on 8x32 color matrix WS2812B
The spectrum analyzer displays the amplitude of signals as a function of frequency, allowing engine...
-
 Unusual Led Ring Arduino Clock, Temperature, and Humidity meter
There are many arduino clock projects with temperature and humidity readings where the results are ...
Unusual Led Ring Arduino Clock, Temperature, and Humidity meter
There are many arduino clock projects with temperature and humidity readings where the results are ...
-
 How to make simple portable PEMF Magnetic Pulser
PEMF (Pulsed Electromagnetic Field Therapy), which is also known as magnetic pulse therapy uses ele...
How to make simple portable PEMF Magnetic Pulser
PEMF (Pulsed Electromagnetic Field Therapy), which is also known as magnetic pulse therapy uses ele...
-
 Single Mosfet Mini SSTC Tesla coil with 10 + cm Spark
A Solid State Tesla Coil (SSTC) is a type of Tesla coil that uses solid-state components such as tr...
Single Mosfet Mini SSTC Tesla coil with 10 + cm Spark
A Solid State Tesla Coil (SSTC) is a type of Tesla coil that uses solid-state components such as tr...
-
 How to Make EM84 (6E2) Vacuum Tube Stereo VU Meter
A VU meter, also known as a Volume Unit meter, is a device used to display the audio signal level ...
How to Make EM84 (6E2) Vacuum Tube Stereo VU Meter
A VU meter, also known as a Volume Unit meter, is a device used to display the audio signal level ...
-
 Universal Arduino Staccato controller for SSTC and VTCC Tesla Coils
The VTTC Staccato Controller was developed in the attempt to create longer sparks from VTTCs while ...
Universal Arduino Staccato controller for SSTC and VTCC Tesla Coils
The VTTC Staccato Controller was developed in the attempt to create longer sparks from VTTCs while ...
-
 DIY extremly Sensitive and cheap Arduino Seismometer
A seismometer, is an instrument used to detect and record ground motion caused by seismic waves, su...
DIY extremly Sensitive and cheap Arduino Seismometer
A seismometer, is an instrument used to detect and record ground motion caused by seismic waves, su...
-
 DIY Extremly Sensitive and cheap Geophone sensor for Earthquakes detecting
A geophone is a device used in geophysics to detect ground movement. It is specifically designed to...
DIY Extremly Sensitive and cheap Geophone sensor for Earthquakes detecting
A geophone is a device used in geophysics to detect ground movement. It is specifically designed to...
-
 Arduino FFT Spectrum analyzer on VFD display GP1287
An audio spectrum analyzer is a device that visualizes the frequency content of an audio signal. It...
Arduino FFT Spectrum analyzer on VFD display GP1287
An audio spectrum analyzer is a device that visualizes the frequency content of an audio signal. It...
-
 DIY simple Spark Gap Tesla Coil
Tesla coil is a type of resonant transformer circuit invented by Nikola Tesla around 1891. It is a ...
DIY simple Spark Gap Tesla Coil
Tesla coil is a type of resonant transformer circuit invented by Nikola Tesla around 1891. It is a ...
-
 DIY PC controlled high power PEMF Therapy Device
PEMF or Pulsed Electromagnetic Field therapy is a type of therapy that uses electromagnetic fields ...
DIY PC controlled high power PEMF Therapy Device
PEMF or Pulsed Electromagnetic Field therapy is a type of therapy that uses electromagnetic fields ...
-
 DIY Precise Arduino Miliohmmeter
In practice, we very often need to measure low resistances. Measuring low-value resistances, especi...
DIY Precise Arduino Miliohmmeter
In practice, we very often need to measure low resistances. Measuring low-value resistances, especi...
-
 The simplest way to determine the quality of lighting in your home - bulb flickering meter
Light flickering can be a common issue and may occur with various types of bulbs, including incande...
The simplest way to determine the quality of lighting in your home - bulb flickering meter
Light flickering can be a common issue and may occur with various types of bulbs, including incande...
-
 Classic Style Arduino Weather Station with three Oled Displays
So far I have made several weather stations that display local values as well as internet data, whic...
Classic Style Arduino Weather Station with three Oled Displays
So far I have made several weather stations that display local values as well as internet data, whic...
-
 How to build simple cheap Hulda Clark Syncrometer
Hulda Clark's Syncrometer was a device she claimed could detect the presence of various substances ...
How to build simple cheap Hulda Clark Syncrometer
Hulda Clark's Syncrometer was a device she claimed could detect the presence of various substances ...
-
-
Open Source Very Large Stick - Freejoy & MMjoy2 breakout board
645 0 0 -
RF Control training board for students based on ESP32 C3
831 0 2 -
-
KINETIC COASTERS with a TWIST! Laser or 3D Print some DIY Magic
701 0 2 -
RPI - 8 IO PLC With ATTiny85 Watch Dog
602 0 1


